
When I heard about Stable Diffusion, the first thing I wanted to do was install it on my Apple Silicon MacBook and try it out. Unfortunately, at that point, I couldn’t do so because Stable Diffusion required GPU support and there was no complete Metal GPU support at that point for PyTorch that you needed in order to test out Stable Diffusion. I was really disappointed, but I made do with Google Colab for my Stable Diffusion work for the moment.
Then I read that the PyTorch nightly builds had MPS (Metal Performance Shaders) support and I tried to get things working again on my M1 MacBookPro (MBP — yes, too many acronyms 😛) but ran into issues with various bugs. While PyTorch did have MPS support, the support was not complete and there appeared to be features which were not fully implemented yet and/or buggy. So I resolved to wait …
But then a couple of days ago, I came across this repo which added partial MPS support for running Stable Diffusion and even had a readme specifically devoted to getting things working on Apple Silicon. I was overjoyed and immediately went for it. After much trouble, I was able to get the code working … somewhat. But there were issues.
As the author of that readme notes, things are changing constantly with regards to Stable Diffusion — a PyTorch nightly, which might work today, would totally break tomorrow. So it was basically very much a crapshoot 🙂 So, while I wanted to document the process, it didn’t seem very realistic that it would help anybody. (Plus, that repo had a lot of dependencies due to the more complex functionality it provided, and so getting everything working correctly was that much more complicated.)
But today I realized that I could use Stable Diffusion so much more easily with Hugging Face Diffusers due to the fact that the dependencies were much simpler for Hugging Face. So I decided to give it a try and what do you know, got everything working on my M1 Mac with minimal effort and very little hair pulling 😛
So I decided to document the process in case it helps somebody else who might have been stuck like me … (Do note that I’m keeping things very simple and step-by-step in case somebody who hasn’t done much with deep learning and/or Python wants to try this …)
If you don’t have it installed already, the first step would be to install miniconda since this makes installing MPS compatible versions of Python packages (and managing various Python environments) very easy.
You can download the latest miniconda installer from here: https://repo.anaconda.com/miniconda/Miniconda3-latest-MacOSX-x86_64.sh
Save it to your hard disk as miniconda.sh (since that’s easier to run from terminal than the really long original file name), then open a terminal and change over to the folder which contains the miniconda installer script. Then run the following in terminal:
bash ~/miniconda.sh
Respond to the various prompts from the installer and if all goes well, you should have miniconda installed on your machine in short time.
Then you need to create a new development environment for Stable Diffusion. This can be done by running the following command in terminal:
conda create -n ml python=3.8.8
In the above, the -n parameter creates a new conda environment named ml and installs Python 3.8.8 under that environment. Other Python versions might work too, but I did my installation with Python 3.8.8 and so that’s the only one that I know works for sure.
Also, do note that you will be installing a nightly build of PyTorch and while it did work correctly for me today, it might not work tomorrow or the day after. So some of this is still a bit in flux, but given that the number of dependencies is very small, hopefully things should keep on working.
Speaking of dependencies, it’s time to install them, but first, activate your new environment by running the following command:
conda activate ml
Do note that you should replace ml with the name you selected if you opted for a different environment name 🙂
Once you are in the new environment, install the dependencies by running the following commands in terminal:
conda install pytorch torchvision torchaudio -c pytorch-nightly
conda install transformers
conda install -c conda-forge diffusers
conda install fastcore
conda install ftfy
The first command installs the latest PyTorch nightly (which has MPS support and the bug fixes you’ll need) and the next two install the transformers package you’ll need to work with Hugging Face Diffusers, and the Hugging Face Diffusers package itself.
The last two are not quite dependencies for Hugging Face Diffusers, but you’ll need them to get around one final MPS error/issue and to get rid of a warning message (that might be confusing) when you finally run Stable Diffusion.
And that’s it for package installations and initial set up! You are now (almost) ready to write some code and generate an image using Stable Diffusion. (Wasn’t that easy?)
To load your Stable Diffusion model, you need to either use a Hugging Face token to authenticate yourself and download the model via your Python code itself (as described here) or just download the models directly yourself.
Since the latter option is simpler, that’s what I did 🙂 But that actually requires a few more installations if you are not fully set up … Sorry. You’ll first need to go to Hugging Face and sign up for an account and do the validations etc. since you are going to require your user name and password (or an auth token) to download the model info.
You are also going to require git and git-lfs installed on your machine in order to clone the model repo. That’s probably done most easily using HomeBrew (installation instructions on the linked page). Once you have HomeBrew installed (or you already have it installed), run the following commands to install git and git-lfs — if you don’t have them installed, that is:
brew install git
brew install git-lfs
Now, you can clone the model repo. First change to the folder where you’re going to have your Stable Diffusion Python code and then run the following command in terminal:
git clone https://huggingface.co/CompVis/stable-diffusion-v1-4
Once that is done, you are set!
The final step is to write some Python code to generate an image based on a text prompt. Here’s the simplest code to do the job:
import torch
from diffusers import StableDiffusionPipeline
from diffusers.models.attention import BasicTransformerBlock
from fastcore.basics import patch

@patch
def forward(self:BasicTransformerBlock, x, context=None):
    x = self.attn1(self.norm1(x.contiguous())) + x
    x = self.attn2(self.norm2(x), context=context) + x
    x = self.ff(self.norm3(x)) + x
    return x

device = torch.device("cuda" if torch.cuda.is_available() else "mps" if torch.backends.mps.is_available() else "cpu")
pipe = StableDiffusionPipeline.from_pretrained("stable-diffusion-v1-4")
pipe = pipe.to(device)

prompt = "an elf sitting on a toadstool"
image = pipe(prompt)["sample"][0]
image.save("sample.png")
The first four lines import the necessary packages and lines 13 – 19 do the actual image generation — we’ll get to that in a moment. But I wanted to talk about the code in the middle from lines 6 – 11. What is that for?
If you comment out that code and run the script above, you’ll get an error like the following after some time:
RuntimeError: view size is not compatible with input tensor's size and stride (at least one dimension spans across two contiguous subspaces). Use .reshape(...) instead.
That is due to an issue in Hugging Face Diffusers which has a fix but has not yet been included in the public release version. The relevant issue can be seen here. Since that fix is not there yet, we have to use fastcore (which is why we installed it previously) to patch the issue ourselves for the time being. Once the fix is in the Hugging Face release version, you can drop the patch code from your script.
Update: The above is no longer true with the release of Hugging Face diffusers 0.3.0. It is no longer necessary to use the above fix and you can make your code simpler now. I’m leaving the original article content in place for historical reasons 🙂
The only other thing worth noting is this line:
device = torch.device("cuda" if torch.cuda.is_available() else "mps" if torch.backends.mps.is_available() else "cpu")
That is not strictly necessary if you want to hardcode your script for MPS. You could drop that line and simply have this line:
pipe = pipe.to(device)
Be this instead:
pipe = pipe.to("mps")
The new line above simply hardcodes your script to use MPS only. The original version will detect your hardware configuration and work correctly for your specific configuration.
Now all that remains is to run the script above. If you named your script image.py, then this is what you’d run in your terminal:
python image.py
If everything works correctly, after some time the script should complete and you should have an image like the following in the folder where you script was:
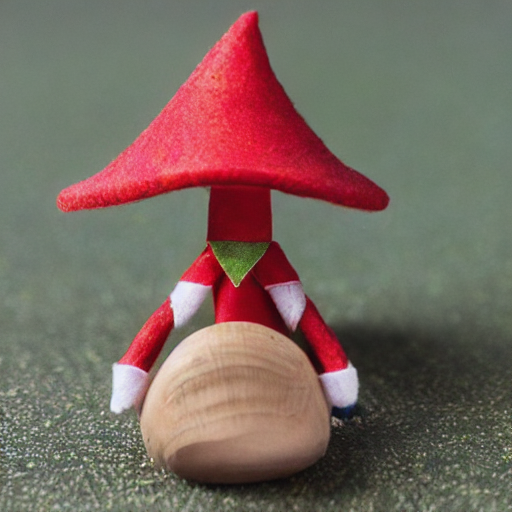
And that’s it! Hope things work just as simply on your Apple Silicon device as it did for me! If it doesn’t and you run into issues, let me know and I’ll see if I can help.
Also, don’t forget to check out the code samples on the Hugging Face Diffusers repo — you can get a lot more fancier with the code than the sample above and the code samples there should give you some ideas 🙂


2 thoughts on “Adventures in Imagineering – Mining the Apple Silicon”