iOS 14 is here upon us — or at least, for those of us who use (and develop for) Apple devices. And with its arrival, it brings along a host of changes to how things are coded for iOS devices.
One thing that appears to have changed that I didn’t notice at all at first was the new way to handle list views. I don’t believe this was mentioned in the WWDC overviews (such as the state of the union speeches) and since I didn’t notice it at the time, I didn’t watch the relevant WWDC sessions either.
In fact, the first time I learnt of these changes was when somebody mentioned something about the image (and text and detail text labels) in a UITableViewCell being deprecated. I was like, “Whaaaaat?”
Turns out that this is the case. The familiar text labels and image views that we’ve used so often to configure a table view cell will indeed disappear in a future iOS version. Or rather, they will stop receiving any new features and updates, though I am told that they’ll continue to be there to provide support for older apps which do not use the iOS 14 APIs.
For new apps, you should start using a completely different mechanism.
I wanted to talk about how the new mechanism works because I didn’t see much mention of this anywhere … except of course, in the WWDC videos 😃
The Basics
The basic idea is simple. Previously, we had table view cells which could have either one or two labels and/or an image. If we wanted anything other than that, we had to create our own custom table view cells.
For collection views, it was even more simple — there were no bundled standard views. Anything we wanted, had to be created as a custom cell view.
In iOS 14, you separate out the view from its configuration. The configuration information is provided via an instance of the new UIListContentConfiguration class. It holds the content (and the styling) for all the different elements (cell, header, footer etc) in a list view.
Not just that, you can even ask the system to provide you the default styling for many types of cells, or even the individual states (selected, disabled etc.) for a given cell. Then, you simply take the default styling, add your own content on top of it (and also make any styling changes of your own) and then pass on the configuration to your table view or collection view cell to display the content in a standard, uniform fashion.
But this mechanism is not there just for collection views or table views, you can even create your own custom views using a content configuration instance and an instance of the new UIListContentView. This way, you can display a standard cell view anywhere in your app — not just in a list view such as a table or collection.
OK, so that all sound interesting, but how does it actually work?
Let’s see the implementation detials with a few examples covering table views, collection views, and stack views — the last for the case where you use a list content view outside a list view.
Introduction to the methodology used
For each case, I’m going to do a code listing which shows the basic approach and then go through what the code does. I don’t know if this is the best approach to explain this, but since I am going to try to cover three different approaches, I didn’t want to spend a lot of time going through step-by-step to explain how things worked — hopefully, this works 😃
Also, do note that each section uses a single, self-contained file with around 50–60 lines of code. There are no storyboard elements in play and you can simply copy the code wholesale and plop it in your project and it should work.
Well, it should almost work …
The screens do depend on the data to be provided via static properties/methods in the model class I use — Book.
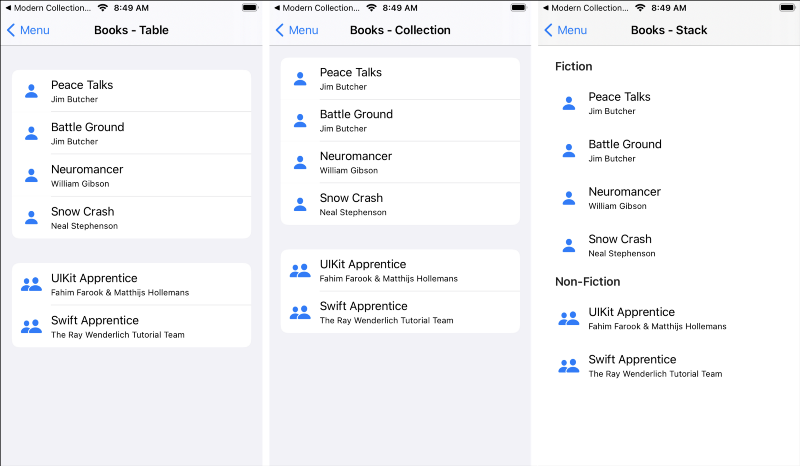
The app (or the screens) are to be a list of books separated into two sections — Fiction and Non-fiction. And each section has several books with multiple attributes. The initial implementations in the rest of the post will rely on displaying the information using a standard cell with two labels and an image and so will not display all the information in the Book model.
Here’s the code for the Book model:
The three static properties/methods named sections, books, and booksFor(section:) help provide preset data for the example views — there shouldn’t be anything complicated there.
Table Views
If you’ve implemented a table view in iOS, the following code should look very familiar:
The basic table view implementation is just the same as before. Where it diverges is in tableView(_:cellForRowAt:) where instead of configuring the cell with the data to be displayed, you get a UIListContentConfiguration instance from the cell (line 32) and then configure that configuration instance with the data to be displayed (lines 36–38).
Once you are done with the configuration, you set the cell’s contentConfiguration property (which is new) to update the cell’s content and styling. When you set the contentConfiguration, the cell’s content view is replaced by a new view with the style and content specified by the configuration. Or, if the view configuration is compatible with the existing content view, then the changes are directly applied to the content view.
That’s all there is to it 😄
Converting existing table view code to the new approach should be fairly easy and you should certainly consider doing so to keep up with the changes in iOS…
Collection View
A collection view implementation using UIListContentConfiguration is slightly different from the table view implementation, but not so different that you won’t recognize things at all 😃
In fact, most of the code should again look pretty familiar to you.
If you look at Line 43, you use dequeueConfiguredReusableCell(using:for:item:) instead of dequeueReusableCell(withReuseIdentifier:for:) to create a new cell instance.
But hang on, where is the UIListContentConfiguration instance? And how is the collection view cell configured with the passed in Book instance?
All of that happens in cell registration, which is actually set up at lines 21–27. The cell registration is used to register cells with your collection view and to configure how each cell is displayed. And if you look at the code there, you’ll notice that it is pretty similar to how cells were configured for the table view!
In fact, the only reason that you don’t have the exact same code as the table view is because collection view cells (UICollectionViewCell instances) don’t have a defaultContentConfiguration property, but the values returned from the cell registration are UICollectionViewListCell instances and they do have a defaultContentConfiguration property.
If you think about it, historically, collection view cells had no standard cells. So there was no default configuration to be received — all you’d have gotten would be an empty cell. The new UICollectionViewListCell instance, on the other hand, does have a default configuration which appears to be equivalent to the table view cells. So, now you can set up a collection view cell to display default values/styles just like a table view.
In fact, if you compare the screenshots at the top, you’ll notice that except for some spacing differences between sections, the two lists display content almost exactly the same.
Stack View
The power of the new UIListContentView instances is that you can even use these list view cells outside of lists! In fact, you can use them anywhere where you’d use a view.
So, here’s how to “fake” a list view by using a stack view — not that you’d necessarily want to do things this way, mind you. But now, if you wanted a single table cell to appear somewhere (for example, say in a settings screen), you don’t have to set up a whole table view with static cells. Or, fake it by creating a custom view to mimic the look.
Instead, you can simply create one or more UIListContentView instances as in the code below:
The only relevant bits of code here are lines 40–43 where you create the header views and lines 48–53 where you create the data rows. Again, you’ll notice that lines 48–53 follow the same familiar pattern you’ve seen before — create a default configuration, update the default configuration, and then (and this is the only difference here) create a new view based on the configuration.
Since table view and collection view cell instances have a contentConfiguration property, you assign your configuration to that property and the cell will take care of either updating the view or creating a new view instance. Here, you explicitly create the view instance by creating a new instance of UIListContentView and then add the new view to the stack view.
When you create the header (in lines 40–43) you use a different preset (plainHeader) to get a configuration for a header element. That ensures that the new view is styled as a header instead of a cell element.
Conclusion
The code above should give you an overview of how to create cells or views using UIListContentConfiguration instances for any use.
Of course, this is just barely scratching the surface 😃 You can simplify the code above even further were you to use a DiffableDataSource. Also, what if you wanted to display more than two text elements and/or extra images in your cell? How would you go about doing that?
I’ll try to cover these topics in future posts, but in the mean time, if you are interested in the topic and want to learn more, the following WWDC videos might be of interest:
- Modern cell configuration
- Advances in diffable data sources
- Lists in UICollectionView
- Advances in UICollectionView
You can also find the full source for my sample project for this post on GitHub.


